

Friendship Bracelet Tutorial
I don't know about you but I'm very bad at relaxing, constantly feeling like I need to be productive with my time which often leads to the complete opposite. However recently, when I've been too sleepy to pick up my knitting, I have enjoyed the repetitive rhythm of tying knots to make friendship bracelets. I used to make them when I was younger but now seemed like an ideal time to start again as they're the perfect way to brighten up someones day or say thank you for recent kindness. Plus there's the added bonus that you can easily start and finish one in an evening, unlike my knitting projects!
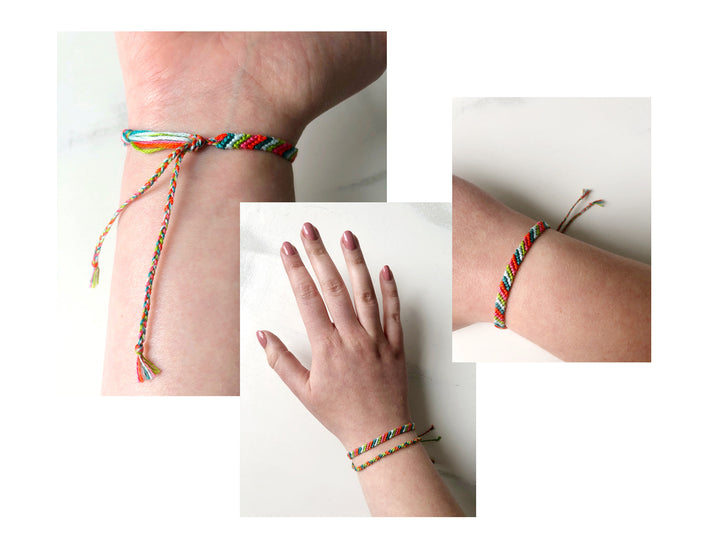
Here, I'm going to take you through how to make a simple 5 colour Candy Striped bracelet. This is a great way to practice getting your knots neat before trying more advance patterns or if you want something that requires less concentration. You can use any number of colours you want, the more colours the wider the bracelet.
We've put together 5 different kits for you here depending on what colour mood you are in!
You will need:
- Loome Tool
- Embroidery Thread
- Sharp Scissors

If you don't have a Loome tool you can improvise by safety pinning the bracelet to your jeans or a cushion, as long as you can keep the threads under tension.

Step 1: For a 5 colour stripe cut approximately 1 metre of each colour thread (the more threads you are using the longer they need to be) and tie a knot to begin, leaving a tail. Alternatively I like to start with a loop ready for fastening at the end. If you make a loop trim the excess thread as close to the knot as possible.

Step 2: Secure your bracelet to the Loome tool by placing the end of the threads through the teeth at the top (another reason I like to start with a loop). Space the threads out in the order you want the stripes of colour to be.
When making a stripe you work from left to right so the thread on the left hand side is the one you will use first, in my bracelet this is the orange. You will use this colour to create knots around all the other thread in turn. Always hold the thread you are knotting around taught.


Step 3: Now we can start knotting. This sounds quite complicated when written out however it is just a simple knot and once you've got the hang of it it is easy, I promise! To create the knot, take the main thread (orange) and place it over the second thread (pink). This will make a triangle shape where two sides are the stripe/main colour (orange) and one side is thread 2 (pink). Bring the main thread under the second and up through the triangle shape. It should look like the image above. Pull tight on the main thread to close the knot and move it up to the top of the bracelet. Make sure to hold the second thread (pink) nice and tight at this point. Repeat this step, knotting around the second thread again. I now have two orange knots covering the top of the pink thread.

Step 4: Repeat the above step, always knotting using the main colour (orange), across the rest of the threads, completing two knots on each colour. So for my bracelet I moved the completed pink thread out of the way to the left and then made two knots around the lime thread, then the pale blue and finally the teal.

Step 5: Once you have completed a row you should have a stripe of the main colour, with this thread now over to the right hand side. What was previously the second thread (pink) will now have moved along and be the first thread on the left. Work your way across the row as before, using the left hand thread as your main colour (pink).
Each time you complete a row the colour you have just made a stripe with should end up on the right hand side and your next stripe will be made with the 'new' left hand thread.

Step 6: Repeat the above steps for every colour, remembering to create two knots on each thread. I like to use my thumb nail to push the knots up to the top so that they are nice and snug to the previous stripe. Now that you have completed one pattern repeat you can use this during the rest of the bracelet to double check that you are working through the colours in the correct order. For my bracelet the next colour in the pattern would be orange and the next thread I will be knotting with, the one on the left, is also orange so this is correct. Keep going until your bracelet is the desired length.

Step 7: There are lots of different options for how to finish your bracelet. You can simply tie a knot using all of the threads and leave this tail to tie it round your wrist. I like to create two plaits or twists and use these to thread through the loop and secure the bracelet. You could also start you bracelet with a plait or twist, then knot the middle section and end with a matching plait or twist. If you started with a loop you could also use a button or bead to fasten the bracelet. So many possibilities!

Step 8: Gift to a lucky friend or family member or wear with pride!
I do hope that was helpful; we have a video on Instagram going through the steps as well. If you don't have any materials at home then have a look at our kits or if you fancy playing around with glittery or neon thread we have top up sets too!
We'd love to see what you make so do tag us on instagram @ayarnstory or send us an email.
Happy Making!